Home / Videos / Sprayers / ATV / Tow or Pull Behind Battery Powered Trailer Sprayer Assembly Instructions
Video Library
ATV / Tow or Pull Behind Battery Powered Trailer Sprayer Assembly Instructions
By DoMyOwn staff
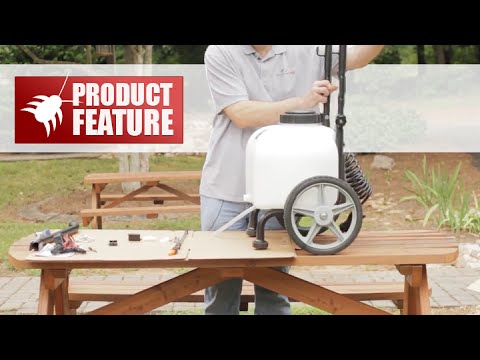
This video shows how to assemble the 9 Gallon Master Gardner Sprayer Cart - ATV / Tow or Pull Behind Battery Powered Trailer Sprayer Assembly Instructions
Hi this is Jim from Domyownpestcontrol.com. If you are watching this video you have either just purchased or are thinking about buying a battery powered 9 gallon Master spray cart. In this video I will walk you through the necessary steps in order to assemble your battery powered 9 gallon master spray cart. You will want to find a place that has plenty of room to assemble you battery powered 9 gallon spray cart. You will also need an adjustable wrench and a Phillips head screwdriver. Remove all the parts from the box. I like to lay them all out and do a quick inventory of all the parts making sure I have everything necessary before I begin to assemble the cart. There are parts located inside of the spay carts tank, unscrew the lid and remove the bag of parts from inside of the tank. You should spread of these parts out and inventory those as well. The very first thing that we need to do is tip the cart over on its side and connect the power plugs together. The cables with the black ends go together. It is very important that you do not plug either of the cables with black connectors into the cable with the red connector. YOU WILL BLOW THE FUSE LINK! The cable with the red connector is used for the remote on/off switch that is needed when using the cart as a tow behind trailer. While we are talking about electrical connections let me show you where you will plug in the charger. The first thing I like to do is knock out all the easy things first. Let's start by inserting the handle into the cart, using the two height adjustment knobs tighten the handle at the desired height. Next let's install the gun clips; these will be used to store the spray wand. Use the screws provided and a Phillips screwdriver to attach. Find your spray wand and attach it to your spray gun which is already assembled on the cart. There is hose cap that needs to be installed on the back of the cart. After every use I recommend that you drain the cart and clean out the tank and spray lines. Removing this cap will allow you to drain out any unused material and or help drain water used to flush out the sprayer. Next we need to install the spray boom. Slide the pipe clamp over the hose coming from underneath the sprayer. Take the nylon 90 degree elbow and slide the hose barbed end into the hose. Tighten the hose clamp. Now find your nozzle bracket. Slide the threaded end of the nylon elbow into the hole on the bracket, so that the body of the elbow is inside the "L" shaped portion. Tighten elbow to the bracket using the nylon nut and adjustable wrench. Now using the two screws provided attach the bracket to the cart using a Phillips screwdriver. You will notice that there are four holes on the bracket but only two places to attach to the cart. If you attach using the lower holes this will raise the bracket allowing for a wider spray pattern. The holes on the bracket toward the top will allow for a tighter spray pattern. Attach as need, you can always change this later if needed. Now let's assemble the spray nozzle. First slide the black O-Ring into the threaded side of the nylon elbow. Now slide in the strainer. Next insert the tip into the retaining nut and tighten to the elbow. Make sure the tip is facing down; otherwise you will be spraying straight up. In order to use the spray boom option there is an off on switch located on the handle side of the cart. When using the cart sprayer as a tow behind simply slide the trailer hitch assembly over the tube on the handle side of the spray cart. Then using the hitch pin, attach the hitch to the cart. You will now need to plug in the remote on/off switch. On the handle side of the cart underneath the control box there is a red plug assembly. Plug in the remote here and run the switch over to your lawn tractor or ATV, now you can easily turn the sprayer on whenever you want. Now you are ready to use the most versatile outdoor sprayer sold today. Thank you for watching if you have any question about this sprayer, or would like information on chemicals used with this sprayer please go to WWW.DOMYOWNPESTCONTROL.COM