By DoMyOwn staff
One of the best things you can do for a Bermuda Lawn, coming out of Winter and rolling into Spring, is to scalp it down! Down with the brown, all the way to the dirt.
View our Bermuda Grass Guide here
Today's the day we scalp the front yard.
Today's the day we take down the brown and scalp the bermuda here in the front and this is mainly for just warm season grasses so for all you cold season folks who are still getting dumped on with snow... I'm sorry.
Now we wanted to wait to do this until we were past our frost-free date here in our region and we're past that but... it's kinda hard to tell because the weather still hasn't decided what it wants to do and if it really wants it to be Spring. Because we're in the low 40s and jumping up to the 80s in the afternoon.
So...
But the chance of frost is behind us and we don't have to worry about damaging our turf from scalping it down like what we're gonna do today.
And just as a side note I left a winter cut here in the front. I left the bermuda at about 2 inches through the winter so that I could protect and insulate my turf through the "harsh winter weather" we get down here in the South.
So real quick before we fire up our lawnmower, let's talk about what scalping does for bermuda grass.
One of the biggest things that it's gonna do is allow for the sunlight to get down into the soil, warm it up, and really allow for new bermuda growth.
In other words... Green up.
Studies through extension offices have shown that scalping bermuda down like this actually allows for it to green up 2-3 weeks earlier than not doing it at all.
And what we have to do is take it all the way down to the dirt. We have to drop the mower as low as it can go to really scalp all that old growth to allow the new growth to sprout up.
So to put it in other words, it's out with the old to let in the new. We've gotta get rid of this barrier of dead growth so that that new growth has nothing to fight against and really sprout up and thrive.
It's just like a haircut. Get rid of the old growth so you can have healthier new growth.
Alright, so enough talk: Let's get to work.
Slow and low baby, slow and low.
Yeah that's been happening... and it's really dusty.
It's a lot of grass clippings.. you want to make sure to bag it and get rid of it, so I guess that's the next step.
Yeah I know, I got the message loud and clear... it needed a wash job so... done.
Yeah. This should give us a pretty big leg up on our competition.
So let's go over a few other things when scalping a bermuda lawn. One thing: you're not gonna harm it. I know it may seem like it when you're scalping it like this... but rest easy knowing you're not. Bermuda roots are really strong and they can get pretty deep... so you're not gonna really harm them.
And like I've already mentioned and I've already done, you want to bag up the clippings and get rid of them. Don't be tempted to just leave them in the yard.
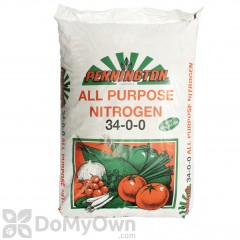
Now that I have it scalped down and gotten rid of the clippings, I'm gonna hit it with a fertilizer... a high nitrogen fertilizer to be exact. And we're gonna use the same one we used in the back for the fescue.
And we're gonna use that fertilizer for the same reason we used it in the back. The Bermuda coming out of winter is really starved for nitrogen. We want to give it a lot of what it did not have through the winter months.
And just to highlight this fact again... this fertilizer that I'm gonna use in the front here is a slow-release Nitrogen fertilizer so it's going to feed the lawn over a much longer period of time.
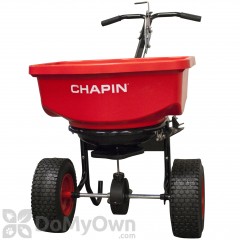
So... I guess it's time to bust down the spreader and get to throwing it down.
So again my entire yard, the front and the back and the sides, makes up about 6400 to 6500 square feet. The backyard is only about 4000 square feet. So the remaining bermuda makes up about 2500 square feet.
So I'm gonna apply my fertilizer at 4 pounds per square feet for the bermuda grass. So that means for 2500 square feet, I need roughly 10-12 pounds of fertilizer. Which is what I've got right here in my hopper. I've got it calibrated accordingly so... it's time to throw it down.
Down with the brown.. check. Bag up and toss the clippings.. Check. throw down some high-Nitrogen slow-release fertilizer. Check. All we gotta do now is water it in.
Like I mentioned at the beginning of this video, we wanted to make sure that last chance of frost was well behind us before we got to this stage in the game. The last thing we want to do is scalp it down, throw down that fert, and push it too hard too soon.
Let's see... back in Mid-February, I think it was, we had some freak warm spells roll through here and things were starting to green up. And a tendency is to bust out the spreader, throw down some fert and start the lawn game. But it was just too soon... Like I said, we don't want to push it too hard too fast.
So if I pushed the lawn harder with this fertilizer earlier after that freeze came through, it would had pushed growth and timing back even moreso than it already has.
Now let me see if I can address some questions that may be popping into your heads right now. Will scalping the lawn like this lead to weed problems? Possibly. If you did not put down a Pre-Emergent back in February and March you most certainly are going to have a weed problem. But if you did put down a Pre-Emergent, you should be safe. Scalping it down like this should not affect that.
If things go according to plan, the very next video should be aerating the entire lawn and putting down that other half of that pre and post emergent that I did back in February.
Once again, I put down half of what I normally put down, knowing that I was gonna aerate later... and when you aerate you break the protective barrier that the pre-emergent offers.
After I aerate, I'll put down that other half-half to once again give my yard a protective barrier against the one thing nobody wants: weeds.
Nice! So there we go. We'll just lightly water that fertilizer in. Greenup should be around the corner.
If you wanna know more about the fertilizer I used in this video, I'll leave a link in the description box below or click that "i" icon on the top of the screen. It'll take you over to DoMyOwn.com where you can read more about that.
If you have other further questions on anything I discussed in this video, something I left out... like I always say in every video: Leave those in the comment section below, Email the Customer Service staff, or pick up the phone and give us a call.
If you're not already, subscribe to our channel by clicking this button right here, you can click this playlist to see all the videos in the Do My Own Lawn Care Series, and this playlist to see all the videos in the Do My Own Gardening series.
And... as always, thanks for watching!