By DoMyOwn staff
In this video, we will go through all the different parts of the Solo 451 Backpack Mist Sprayer so that you can get the job done, just like the pros.
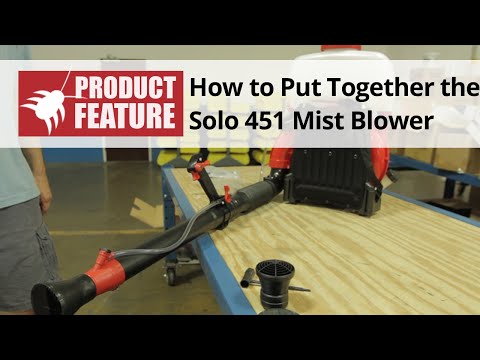
When you receive your Solo 451 it comes with a Torx screwdriver which fits every nut and bolt and the Solo. The first thing we'll want to do is put the swivel elbow install that. Loosen the screws. Slide the elbow up into place and then retighten the screws and then kind of test it. Make sure it swivels back and forth freely.
Next we're going to want to install the flex part to the elbow. In order to do that, you're going to want to use the hose clamp that has the wire clips on it. This will hold the throttle cable and your product delivery tube. On the end of the flex tube, you'll see a ridge and that ridge is what holds the throttle handle from rotating on the shaft. So what you're going to need to do is loosen the screws significantly on the throttle handle, snap it over the ridge, and once you get it over there, tighten the screws, and you'll notice now that your throttle handle will not spin or twist on the shaft. It will stay nice and secure. The last piece we'll want to connect is the straight tube which connects just after your throttle assembly. You'll want to use your last hose clamp, again the screws are already in there, you'll need to loosen those screws. Slide that assembly together, and then tighten those screws.
Before we assemble the clear tubes that will deliver the product, you're going to notice that there is two separate sizes. One is a longer tube which goes from the tank to the throttle assembly. The shorter tube goes from the throttle assembly to the delivery tip. After you assemble the long one from the delivery tank to the throttle assembly, you can then snap it into the hose clip that you installed earlier. This will hold the tube up out of the way. Also the throttle cable goes in just under that tube, and this keeps those cables from hanging loose. The short tube goes from the throttle assembly to the red tipped cap that goes on the end. And, you'll notice that there are no hose clamps that hold these tubes on; you really just force them on the ends. On the very end of the tube is a red cap, and that red cap is what the clear hose connects to. And on the end of the red cap you can change out the spray nozzles that you'll have, so you can either spray a round pattern , a divided pattern, or an angled pattern. And all those different cap assemblies come with your Solo 451.
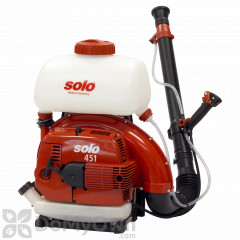
On the throttle assembly you'll notice there is an On/Off switch. It looks like an I and an O. Just think of it like this: I is for Ignition or on and O is for Off. You need to have it in the I position or the on position in order to start the Solo. If it's in the off position, you will not be able to start your solo. Also there is a choke on the rear left side. The choke position is the one that crosses the pattern and the open position is the up. So you'll want to put it in the choke position in order to start the Solo and as soon it starts, you can flip the choke to the open position.
And it's that easy with the expert help from Do My Own Pest Control dot com.
Make sure to subscribe to our channel for more instructional and product videos.