Have a Question? Ask Our Pros!
Average Rating
There are no reviews for this product yet. Be the first.
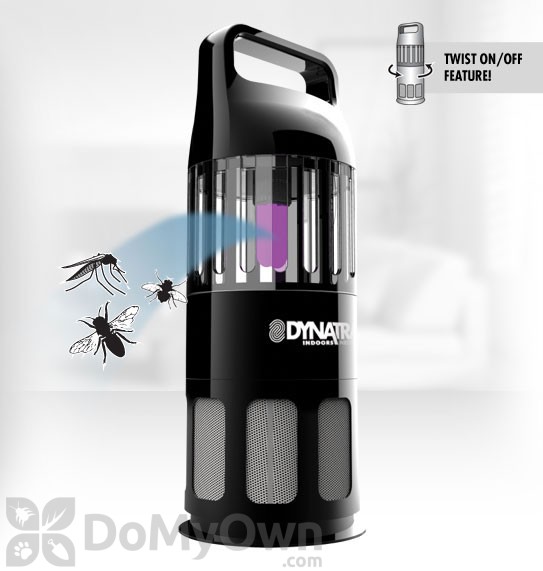
Dynatrap Indoor Insect Trap - Indoors 1290 sq ft (DT300IN) is a portable indoor trap which will provide a perfect solution to your insect control problems. This trap is very effective on getting rid of mosquitoes and other insects including flies, pantry moths, and Asian beetles without using pesticides, chemicals, and without the need for zapping and buzzing, making this unit smokeless and pesticide and odor free. It uses a UV light and Titanium dioxide-coated surface that produces Carbon Dioxide (CO2) to attract insects. Once they are lured inside, the vacuum will quietly suck and trap them inside the compartment until they dehydrate and die. This model has a transparent inlet which allows more UV light to shine, hence, attracting more insects from a wider range. It also highlights an exceptional twist-on/off feature that will make sure insects cannot escape while the unit is turned off for cleaning. It is made of durable materials to guarantee that it can withstand all kinds of weather.
The DT300IN is easy to set up and weighs less than 3 pounds, making it very portable so you can conveniently take it from room to room. This is ideal for indoor use and can cover up to 1,250 square feet. This product comes with a 1 year warranty.
Product Documents
| Target pests | Mosquitoes and other insects including flies, pantry moths, and Asian beetles |
|---|---|
| For use in | Indoor |
| Pet safe | Yes, when used as directed |
| Dimensions | 5.9' Diameter x 15.2' Height |
| Coverage Area | 1,250 square feet |
| Number of bulbs | 1 |
| UV Power | 7 Watts |
| Voltage | 7 ft. cord - 115 VAC (plugs into AC) |
| Color | Black |
| Warranty | 1 year warranty |
| Parts Included |
7-Watt Replacement Fluorescent Bulb (1 Piece) Fan Blade and DC Motor Ultra-Long Life Replacement Retaining Cage |
| Shipping Weight | 2.75 lbs |
| Manufacturer | Dynamic Solutions (Mfg. Number: DT300IN) |
| UPC | 043256283001 |
How To Install the Dynatrap
CLEANING
REPLACING BULB
The light bulb life expectancy is approximately 3,000 hours (or about 4 months), and should be replaced regularly to ensure optimal UV effectiveness. Even though the bulb’s light may be visible to you, its ability to attract insects diminishes over time.
There are no reviews for this product yet. Be the first.
There are no questions for this product yet. Ask the first.