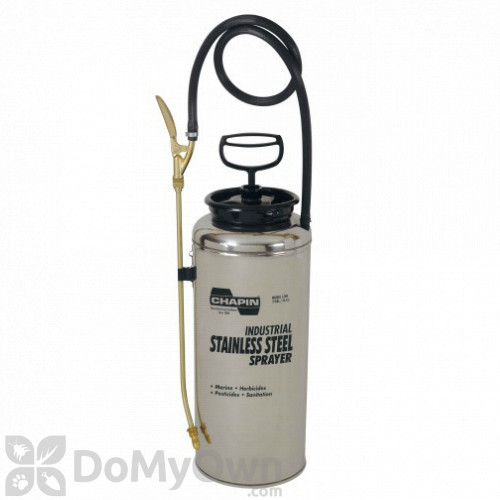
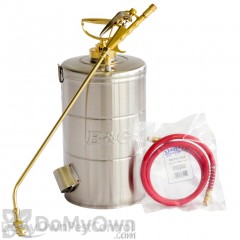
The Chapin Industrial Stainless Steel Sprayer is a heavy duty sprayer for watering, herbicide, fungicide, fertilizer, or concrete additive applications. It is best utilized in pest control, concrete, cleaning or degreasing applications. The Chapin Industrial Stainless Steel Sprayer features a 3 gallon stainless steel tank, extensive Tri-Lock opening, and a brass pump, nozzle, 18 inch wand and handle spray.
Brass Shut-Off
Cast in brass for durability and easy cleaning
Metal Industrial Pump Handle
Chapin industrial die cast handle
Stainless Steel Tank
Tank constructed of stainless steel
Tri-Lock
Chapin large opening for industrial sprayers. The 3-prong patented design creates a strong, even seal for safe pressurizing
Viton Seals
Equipped with Viton Seals in necessary key areas. Viton is a brand of synthetic rubber and fluoropolymer elastomer commonly used in o-rings and other molded or extruded goods.
Directions For Use
1. Hose to Tank
Make sure hose is pushed all the way to the tank. Make sure hose clamp is tight and below the hose barb. Turn clockwise with a screwdriver to tighten.
2. Nozzle
Attach nozzle to shut-off handle or extension wand.
3. Pre-Use Check
1) Do: Check tightness of hose nut to be sure hose is securely attached to the tank outlet.
2) Do: Inspect hose for deterioration, cracks, softness, or brittleness. If any of these conditions are found, replace hose before using. Replace with original manufacturer’s parts only.
3) Do: Remove pump (see Filling, Pressurizing and Spraying Instructions), inspect interior and exterior of tank for signs of deterioration of body and bottom. Any sign of deterioration indicates possible tank weakening and could result in explosive bursting under pressure. If any of these signs are found, discard tank immediately and replace. Do not attempt to patch leaks, etc., as this could result in serious injury.
4) Do: Follow Filling, Pressurizing and Spraying Instructions, except use water only.
5) Do: Pump plunger 8-10 strokes and inspect for leaks.
6) Do: Direct shut-off away from you and open to make sure discharge is not clogged.
7) Do: If unit passes this test, release pressure (see Pressure Releasing Instructions), empty tank, and proceed with Filling, Pressurizing and Spraying Instructions.
4. Filling
1) Do: Turn pump handle counterclockwise and remove pump.
2) Do: Prepare spray solution following all directions and safety warnings on chemical label.
3) Do: Fill tank to no more than the proper gallon marker. Do NOT: overfill to accommodate pump.
4) Do: Check pump to make sure that no grass or dirt is stuck to barrel. Replace pump in tank and tighten securely.
5. Pressurizing and Spraying
TO LOCK HANDLE: Push handle down to depress coil spring and turn handle 1/4 turn clockwise, then allow handle to raise into lock position.
TO LOCK PUMP: Place pump prongs down into slots in funnel, turn clamp clockwise to furthest position under bottom slot, then turn handle clockwise until tightly locked and sealed in place.
TO UNLOCK PUMP: Turn handle counterclockwise until 3-prong clamp is loose. Then rotate clamp counterclockwise to stop and lift out.
TO RELEASE HANDLE: Push down to depress coil spring and turn handle counterclockwise 1/4 turn, then lift handle. Pump until you feel resistance.
6. Fatigue-Free Spraying
For constant spraying, push down on shut-off handle and move locking mechanism away from you. To release, squeeze handle and move the locking mechanism back towards you.
8. Care, Storage and Maintenance
1) Do: Rinse tank thoroughly with water only, empty, refill with water. Follow Filling, Pressurizing and Spraying Instructions, except pump unit only 8-10 strokes.
2) Do: Open shut-off and allow water to run through discharge assembly.