
Bird Barrier Eagle Eye Wind Powered Kit (EE-WS)
Price/Ea.
$289.83
Buy 2 or more: $288.39 each
Have a Question? Ask Our Pros!
Email Our Pros
We're here to help
Offline. Leave Us a Message
You May Also Need
-
Product Overview
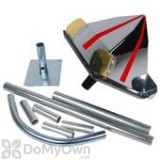
Bird Barrier Eagle Eye Wind Powered Kit (EE-WS) is an all in one installation kit that includes one Eagle Eye, 12 crimp connectors (6 male, 6 female), one piece of 10 inch and 16 inch extension support tube, one 90 degree support tube, four 3 inch interconnection tubes, 20-self tapping screws, and one surface mounting bracket. This will let you use your Bird Eye without electricity since it is powered by the wind. Eagle Eye is an optical bird scarer that effectively deters birds without causing them harm. It makes use of light beams that is reflected from direct sunlight or artificial light to avert birds from target areas. Birds are disturbed with reflected light beams, which flash at different angles from a rotating Eagle-Eye. That way, birds will tend to divert their flight and head to a different direction.
The Bird Barrier Eagle Eye Wind Powered Kit is powered by the wind and it spins on its own so electricity won't be necessary. But it comes in a complete package with all the tubing and connectors needed for motorized setup to make installation much easier. The Eagle Eye is ideal in most places especially for large, open areas with pest bird problems.
MPN has changed from EE-04 to EE - WS. Still same product.
-
Details
Target pests Pigeons and gulls For use in Open, exposed areas where bird populations cannot be controlled with mechanical means; parking lots, roof-tops, warehouse doors, building facades, agricultural settings, public areas, etc. Application Installation is simple, the important step is determining the best placement for the device. Dimensions 16.00 x 12.00 x 10.00 Voltage 12-volt power supply Material / Construction Durable ABS plastic, aluminum and galvanized steel Special Features Wind powered. Can be used stand-alone or motorized. Warranty One year warranty against mechanical failure and ultraviolet degradation. Parts Included Eagle Eye Hat, 12v Power Supply (design may differ), 25 ft. Lead-Out Wire, 12 ea. M/F Connectors, mounting plate, straight pipe (10 in. and 16in.), support tube 90-degree, 3 each connecting tubes, self-tapping screws Shipping Weight 11.00 lbs Manufacturer Bird Barrier (Mfg. Number: ee-1ws) Installation Instructions:
Step 1: Assembling the Support
The Eagle Eye is designed to be mounted as high as possible. Please refer to a Bird Barrier representative for a free consultation on the most effective placement.
You will be assembling a rod connecting the surface to the Eagle Eye starting with the mounting plate.
From the mounting plate, you can attach a straight tube by utilizing one of the small 3” connecting tubes. These tubes fit in between the straight pipe and the mounting plate. Self- tapping screws will ensure a solid connection between the 3 pieces.
Following this method, a second straight pipe can be added as well for height using an additional connecting tube.
When using self-tapping screws, use caution not to pierce the wire.
For Wind Powered Units, assembly is the same, minus the wire.
Step 2: Running the Wire
Insert the lead out wire into the created pipe, starting from the mounting plate. Pulling the lead out wire out from the top of the pipe, be sure you have enough length to attach this to the wires protruding from the Eagle Eye itself, inserting a connecting tube between them. Once the wires are mated together, assemble the Eagle Eye to the straight tube using self-tapping screws.
Step 3: Final Preparations
On the end of the wire coming from the base, attach the lead out wire to the 12v power supply. The RED wire from the Eagle Eye is positive. In order to ensure the correct polarity, test the connection before finalizing the installation. The Eagle Eye should initially spin at a high RPM, even eventually returning to a steady slower RPM.
Vertical Installations
For a vertical installation, such as against a wall, please install the mounting bracket directly on the wall so the pole is protruding horizontally. Following the same procedure from the flat installation, install the 90 degree support tube and continue to mount the Eagle Eye on top with the wire connection being the same.
-
Product Documents
-
Customer Reviews
-
Questions & Answers