
Earthway 1001-B Precision Garden Seeder


Price/Ea.
$170.16
Have a Question? Ask Our Pros!
Email Our Pros
We're here to help
Offline. Leave Us a Message
You May Also Need
-
Product Overview
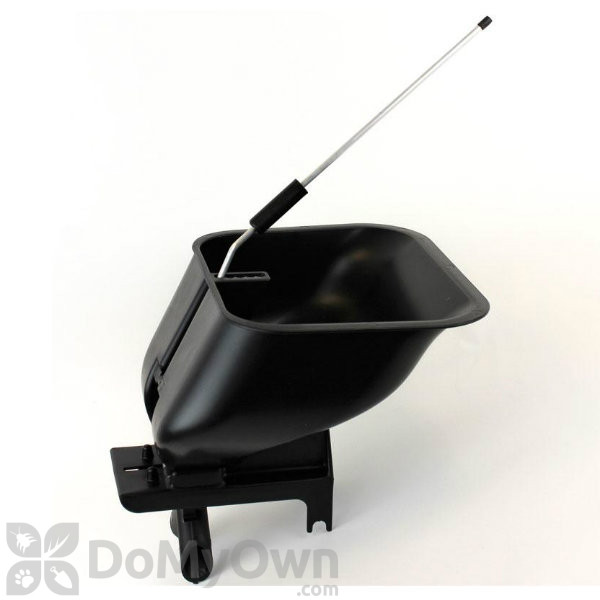
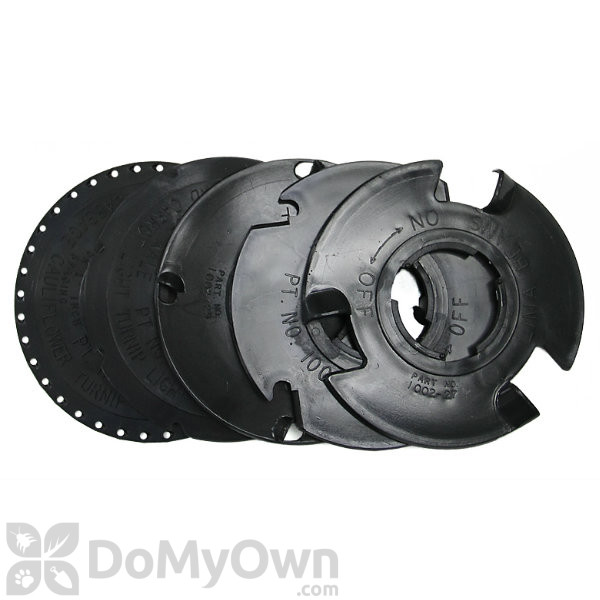
Earthway Precision Garden Seeder is a must-have tool when it comes to gardening. It is specially designed to make planting row crops more convenient and hassle-free. Made with high-quality materials so it is proven to last long. The Earthway Precision Garden Seeder comes with an aircraft aluminum semi-assembled frame to ensure stability and easier control of the seeder. It features a row marker that comes with a row marker retaining clip to make sure it is secured. Its rustproof-wheels are perfect for rough and bumpy surfaces. This ideal row crop planter has six precision seed plates that can be used for carrots, turnips, lettuce, sweet corn, small and jumbo peas, beans, leeks, beets, radish, okra, spinach, and swiss chard. It has a ground opener that can be easily adjusted depending on the seed. Offers durability and excellent performance plus, a five-year limited warranty.
-
Details
For use in Outdoors, vegetable gardens, flower beds. Application Install one of the precision seed plates that best fits your seed, then adjust the depth of planting on the ground opener, and then set your row marker for the desired width, then fill the seed hopper with seeds, then begin pushing in your well-tilled soi Material / Construction All aircraft aluminum. Special Features Comes with six precision seed plates. Warranty 1 Year Limited Warranty. Parts Included An adjustable ground opener, 30 Shipping Weight 10.00 lbs Manufacturer Earthway (Mfg. Number: 1001-B) UPC 052732100121 PRECISION GARDEN SEEDER - Assembly
REAR WHEEL
- Lower kickstand at the front to hold planter upright.
- Remove nut, bolt, and axle from the frame.
- Insert axle through the rear wheel, place between the frame, and line up with holes at the end of the frame.
- Reinstall bolt and nut, and tighten.
HANDLE
- Remove nuts and bolts from Plastic Bag. (These are special lock nuts. A wrench will be required to remove and install them).
- Bolt handle in place using bolt & nut.
- Install the Row Marker Retainer Clip from the front to the back and press into place in the holes on the handle.
ROW MARKER
- Place row marker shaft in front of row marker bracket and line up holes.
- Insert clevis pin through row marker shaft and row marker bracket, and insert hairpin clip through clevis pin. When not in use, secure the row marker shaft to the Handle Bracket with Clip to hold in place.
- A cord may be tied to the Handle Bracket with Clip and row marker shaft for lowering and raising the row marker.
Precision Garden Seeder - OPERATION
- You will find one seed plate in place in the hopper, the rest in the box. A. To remove the plate, hold pulley and belt stationary with one hand and rotate the seed plate approximately 1/2” in the “OFF” direction as indicated by an arrow on the seed plate. B. Push the seed plate off the hub through the hole just above the pulley. It will slip off easily
- To select the desired seed plate, see the SEED PLATE GUIDE if the seed is of similar size and shape as those listed. It is best to experiment before planting. If more distance is desired between seeds, place a piece of masking tape over, or fill with beeswax every other hole or as required in the seed plate.
- To install the desired seed plate, hold the seed plate at an angle with the bottom against the straight wall in the seed hopper. Line up the slots against the inside of the seed hopper and rotate it approximately 1/2” in the “ON” direction as indicated by the arrow on top of the hopper until the cam action locks the seed plate in place on the hub. Do not force. OFF or ON directions are also indicated on the seed plates.
- Pour seeds in the seed hopper. CAUTION: Do not fill the hopper above the center of the seed plate. NOTE: All the seed, especially small seed, will not be picked up by the plates leaving a small amount in the bottom of the hopper. Tilt the seeder to the right as you move down the row to help remove most of the seed if required.
- Next set the adjustable planting depth with the wedge-shaped ground opener located directly under the hopper. NOTE: There are graduations in both inches and millimeters on the front angles of the seed chute. Move ground opener until top edge is in line with desired planting depth. Retighten wing nut after adjustment is made. Check the depth by moving the seeder forward a few inches in soft soil, readjust if necessary.
- Mark out the first row with string and stakes. Lower the row marker shaft and adjust the row marker to the proper width for the next row. Lift the kickstand over the Front wheel. Be sure the cover chain follows behind the ground opener. You are now ready to plant.
- To empty any remaining seeds, lower the kickstand and tip the seeder forward until all seeds are removed. NOTE: When changing seed plates, be sure the seed hopper is completely empty.
NOTICE: Keep your seed hopper clean and free from dust, sand, dirt, and seed treating materials.
-
Product Documents
-
Customer Reviews
-
Questions & Answers


3/FurnitureSafe_(2)3.jpg.thumb_240x240.jpg)
